Growing Bell Peppers in Pots Open Fair Discussion
Growing Bell Peppers in Pots is so easy. It is a really great fun to grow some bell peppers in pot of your own if you are also a peppers lover like me. To have some fresh and hot bell peppers, you need to learn how to grow bell peppers. Following a few steps, you can grow them form your kitchen as well.
To learn how to grow your own peppers is really exciting. I still can remember that for the first time, I bought some peppers from a store and saved the seeds to produce some plants from them. I sew them at one corner of my yard. It’s really fun, fascinating and affordable.
Today in this article, we’ll tell you all the steps that you need to follow for a successful bell peppers production. You can also grow some other peppers like jalapeno, banana, serrano and others following this method.
Growing Bell Peppers in Pot
Before discussing something additional, we need to talk about the main and basic steps to follow for growing bell peppers in pots. Later on, we’ll discuss in detail see below;
Manage Seeds and Other Supplies:
To grow of your own, you must start from the seeds. To do so, you need to buy some seeds, pots, well prepared potting soil, and stakes for a successful harvesting and expected production. It’ll be best that you’ve manage all the equipment’s in your hand on 1 day.

Sow Your Seeds Indoors for Better Experience:
It’ll be best to start from the seeds indoors. It’ll minimize your maintenance labour and cost. Sow in such a place where there is enough light and air circulation. For initiating germination, ensure sufficient moisture and warmth for your seeds.
Provide Light When Sprouts Seen:
Ensure light when the seeds start sprouting. It’s highly recommended to install LED growing light for the newly born seedlings. Placing then just after a sunny window will allow you to keep your light switched off.
Growing Bell Peppers in Pots Fertilizing
To ensure a faster growth and healthy seedlings, you need to begin applying light fertilizer soon after they start forming leaves. The peppers will be strong enough to handle within 3-4 weeks of sprouting.
Transplanting into a Larger Pot;
You can take immediate action to transplant the seedlings into a large pot. You must be careful about the safety of the roots while transplanting. Also, you cannot but select a larger pot for the purpose for better outcome.

Pruning Early Buds of the plants;
The seedlings may produce flower as the growth process continues. Sometime, flowering may be seen at the indoors. But, it is highly recommended to pluck these early flowers until you have planted them outdoors for their final planting when they are of 3-4 weeks.
Hardening off Your Plants;
You can allow the plants outside only after the risk of last frost gone and there is 55 degrees temperature at night.
Watering the Plants Consistently;
This is one of the most important issues to grow peppers. You must bear in mind that the peppers like even watering. But, never they like to be overwatered. Ensure moisture for them; never make them soaked. Ensure some drainages to deliver the extra water outside from the root of the plants and to prevent water logging.
Growing Bell Peppers Nutrients while Fruiting
For expected harvesting, it is essential to have clear conception and ratio of fertilizer for your peppers. Remember, nitrogen is one of the most important fertilizers for any plants and it helps the growth. But, once your plants start fruiting, they need a little nitrogen. Of course, they’ll be in need of more phosphorus, potassium along with calcium in order to produce more and more peppers. Growing Bell Peppers in Pots some tips;
Harvesting Peppers as They Ripen;
At the mature size, you can harvest bell peppers. Most often, they are collected still having green color. Remember, bell peppers are more notorious and sweeter when they fully ripe.

That’s all you need to do in brief. Now, shouldn’t we know the steps in detail about how to grow bell peppers in pots? Why not? Let’s go.
Comparison of Peppers Planting (Pot Planting Vs. Ground Planting);
Of course there should be a clear conception about pot planting and ground planting. There are some benefits and demerits of them. I’ll discuss the merits and drawbacks of pot planting of peppers firstly. In spite of having some in ground garden, always we like to grow some of the peppers in pots. It’s really amazing and funny.
Bell Peppers Some Benefits
Among the best known benefits of pot planting, better mobility, aesthetic appeal and reduced weedling is mostly notable. Perhaps it’ll be easy for you to grow bell peppers in pots if you have a balcony ensuring good sunlight exposure. Growing Bell Peppers in Pots below;
Drawbacks;
The drawbacks include large footprint, smaller yields and more frequent watering. The mobility of potted plant is superb and the small amount of soil leads to small pepper yields and frequent watering.
Always ensure more than one plants in a pot as the cost is low. Of course you’ll avoid overcrowd. After transplanting them, some of the plants might die and the second one will survive then. If both of them survive, select the strongest one and uproot the extra piece of plants. Maintain a well distance among the plants placing them.
Seed Varieties;
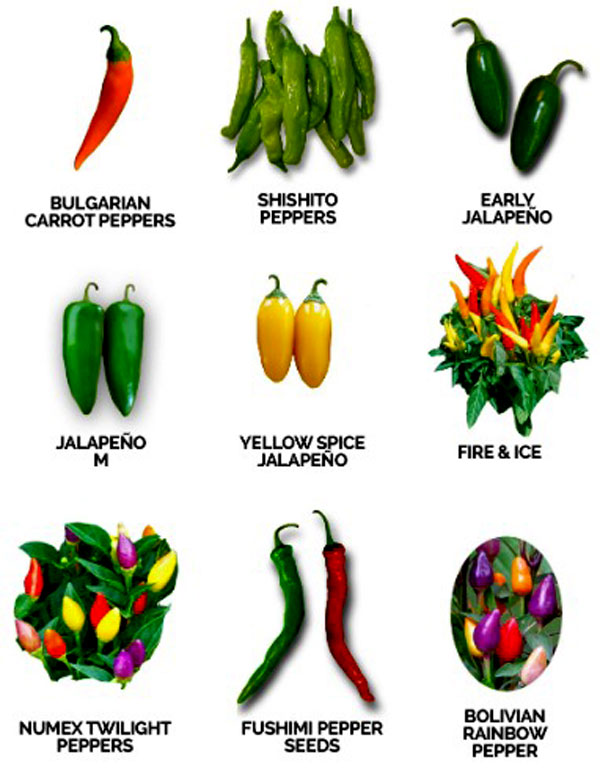
If you’re planning to start from seeds, you must be well planned. First, you need to learn about the different kinds of bell peppers and their characteristics. There are a multiple varieties available in the market and depending on your demand and the condition of your growing area, you’ll select the variety that suits best for your reign.
Growing Bell Peppers Containers’ Type and Size
This is one the mostly asked questions that how long or big the pots should be for bell peppers? The easy answer is the bigger the pots is, the better the harvesting will be. But, the container should be at least 3 gallons of volume. Growing Bell Peppers in Pots.
To get a better yield, you’ll need 5-10 gallons of volume. And it’ll be possible only if you have a lot of space for them. Select a pot that best suits for the location. Remember, pots that are less than 3 gallons, will result into less full-sized peppers. Few extra care below;

Grow Lights;
To ensure a healthy start and better growth of the plants, you need to ensure a strong lighting system. To start from the seeds, you’ll need to consider an indoor grow light as well. Install the light maintaining a gentle distance from the bottom so that the plants may not be hurt due to excessive lights; and can get required temperature from the light source.
Soil;
To start from the seed, you need seed starter soil. Such type of soil provides no nutrients. So, you must begin with a light schedule of fertilizer soon after the seeds start sprouting if you like to start in the starter soil.
Also you can start from plants. Directly plant them outdoors and you need to collect some well-rounded soil. It’s easy to manage them from a nearest nursery. Anything that ensures good balance of nutrients will do enough for this.
Fertilizer;
Finally, the thing that you need to think is fertilizer. There are so many question about the best fertilizer and other nutrients for peppers plants. To have a quick tip, follow how to grow hot peppers. And for your best outcome, you can take help from nearest agricultural office or a trustworthy nursery.
Planting the Seeds of Bell Peppers
When you’ll all the supplements in your hand, you can go ahead to sow the seeds. And to aid you in this regard, you can follow our article how to start seeds indoors for the best outcome. Growing Bell Peppers in Pots.
Time to Start from Seeds;
One of the mostly important thing is to know the sowing time for bell peppers. It’s so important that you can neither have healthy plants nor a successful harvesting without an exact starting. Also, the sowing period starts differently depending on the climate of your growing zone. You can take help form the online source to know the exact date of sowing the seeds.
But on an average, sow some seeds indoors just before 6-8 weeks of last frost in your location.
Sowing Bell Peppers Seeds;
Prepare your seed trays only if the sowing period arrives. Once again, we recommended to follow our article how to start from seeds indoors for a successful germination and healthier plants. However, some of the important steps are listed here that you must follow. Growing Bell Peppers in Pots more steps;
Pre Moistening Your Soil
Ensure that you’ve made a well mixture of the soil by moistening thoroughly. Squeeze the soil and if it is stick together, be sure your soil is well wet. Of course, there’ll be no water dripping.
Fill Seed Cell with Soil;
In order to packing the seeds down, fill each of the seed cell with soil when you think, your soil is well moistened. To ensure an easy and comfort development of the roots of newly grown plants, never pack too firmly.
Sow Seeds ¼ Inch Deep;
Sow the seeds maintaining a depth of ¼ inch. We recommended to sow 2-3 seeds per cell as you know, always there is a chance to miss every germination. Select the weaker looking plants when sprouting completes. Uproot it and ensure only one plant per cell.

Water the Surface Lightly;
Use a watering can or spray machine to water the surface of the soil lightly after the seeds being planted. Make sure that you did not disturb the seeds by misplacing them from here to there. It’ll damage or destroy the germination process.
Ensure Moderate Temperature
Temperature is one of the most important supplements for germination. The required temperature is 75-85 degrees F. if you think your growing reign is cooler or less than the demand, install an artificial lighting source to ensure temperature besides;
Early Care for Bell Peppers;
Early care for bell peppers refers to the conditions when you’ll be able to ensure adequate lighting, water and nutrients for them. Ultimately, long term success fully depends on this steps and a single mistake can break your dream to enjoy some fresh, self-grown bell peppers.
Lighting for the Seedlings;
After the seeds sprout, the main task you need to complete is to install a light for the seedlings to ensure adequate temperature. Remove humidity dome. Only if you can ensure enough natural sunlight for the seedlings, you need not to install growing light. You can plant just after a sunny window or can place the pots in such a place where they can enjoy sufficient sunshine.
Fertilizing the Seedlings;
As the sprouts come out and the seedlings develop, they start needing nutrients. Though the need is very poor, providing fertilizer is mostly essential. According to the need, don’t forget to plant for some nitrogen, phosphorus and calcium for your seedlings along with some other fertilizers.
Watering For Seeding
If you find that ½ inch of your soil is dry, start watering. Never you should allow the seeds cell to dry completely. Gently water so that their positions don’t change. Water lightly to avoid water logging. Remember, less water may destroy the project, as over water may. Now you should to know;
Transplanting the Bell Peppers;
When the seedlings are about to 3-4 inches, they are ready to be transplanted. But, before plating them into the final pots, we use a pot of 3-4 inches to plant the seedlings to be matured enough for final plantation. By doing so, you can maintain a transitioning stage up. Always you have your own choice and you can transplant into a large one for final plantation as you like. Maintaining a stage will ensure you stronger and faster grown plants.

Preparing the Potting Soil;
As we mentioned before, pre-moistened the potting soil with water. In cause of you final plantation, we recommended to mix some bone meal and Epsom salt with the soil before you transplant.
Filling New Pots with Prepared Soil;
Once you have your soil ready for application, fill each of your pots. Pick them gently. Don’t forget to level the pots immediately if you are going to experience with several varieties. This’ll help to recognize you the actual variety correctly and quickly.
Digging a Small Hole;
You need to dig a hole large enough to fit the root all of your plant in the pot. Using your finger or a spoon, you can easily make such a hole.
Planting the Seedlings
Remove the seedling with soil from the seed bed; place the plant into the new hole in the pot. Cover with soil and pack it down. Water lightly and allow the plants under lights.
Don’t worry if you notice that the actual growth of your plats have been postponed or disturbed. Soon after transplanting, it’s normal to slow down the growth. Remember, bell pepper plants grow quickly and soon you’ll notice recovery of your plants and they’ll flourish as quick as a plant can.
Setting Bell Peppers Outdoors
Plan to set you bell peppers outdoors if the end of winter is approaching. This is often known as hardening plants. All you need to be careful of, is sunlight. Remember, direct sunlight is more intense than growing light. So, let the plants adjust with the sunlight gradually and you must protect them from sunscald. Growing Bell Peppers in Pots.
Rough Schedule for Transplanting Outdoors;
| Age of the plants | duration |
| 1st week | 20 minutes of sunlight or 1 hour of shade |
| 2nd week | 1 hour of sunlight or 3-4 hours of shade |
| 3rd week | More than 1 hour- 2 hours or full day in shade |
| 4th week | Permanent planting for outdoors |
Growing bell peppers has multiple benefits and one of them is its smooth mobility. You can easily move it from here to there according to your needs. Watch for the symptoms of sunburn or wilting leaves. If you notice, move the pot back to indoors.
Temperature is one of best conditions for growing bell peppers. You know, bell peppers grow well in night temperature and it is best suited with the temperature of 55 degrees F. for the day, the temperature range should be at 75 degrees F. so, to get a desired harvesting of bell peppers, ensuring this temperature level has hardly any complement. Without proper care or attendance, who can hope for a good crop? Yes, he, who is foo, can. So, taking care of your bell peppers is a must especially after your successful outdoors transplant.
Plucking Early Buds of the Flower
Pluck off the early buds from your bell plants. This should be continued till 2-3 weeks after transplanting outdoors permanently. Allow the later buds to become fruit. Growing Bell Peppers in Pots easily;
Staking;
Providing a support for your bell plants can really be helpful as the plants bend to be on the tall side. Drive a stake deep into the pot. Tie the plant loosely with the support using Velcro.
Fertilizer;
If you think that the fertilizer you used in potting mix is enough to get the most out of your bell peppers plants, you’re wrong. FoxFarm’s Trio of Fertilizer is recommended to apply following the schedule below:
To maintain and ensure growth and strong root development along with healthy leaves, Grow Big is used at the early stage. After that, you need to stitch to Big Bloom or Tiger Bloom to ensure or support healthy flower development.
It’s a remarkable note to bear in mind that the fertilizer you’ll use at the early stage of growth, should contain more nitrogen than other elements. But as the time passes and the plant develops into maturity, your fertilizer will ensure less nitrogen gradually and more phosphorus for better fruiting experience.
Watering;
Do you know that overwatering is mostly done common mistake for pepper plants? Especially the new gardeners can take an excess care of their plants.
If you want to avoid some common issues caused by overwatering, let your soil be dry between the watering period. You can apply your own finger to test the moister level beneath the surface level of soil. Create a narrow drain from the plant to the outside of the pot so that the extra water can be delivered outside.
Growing Bell Peppers Problem Facing
Don’t forget that every time everything won’t go ahead as you planned it to be. So, we must be prepared to face some problems and they are as listed. Growing Bell Peppers in Pots by some steps;
Curling Leaves;; This is the mostly noticed concern for bell peppers. This is caused for some wrong steps or carelessness.

Yet, nothing to worry about, consult with an agro officer or nearest nursery. The remedy of this problem may different for different reign. That’s why we cannot recommended any particular chemical. You can apply any of them available in your reign.
Yellow Leaves;; Though yellow leaves may be resulted from several factors, nutrients deficiency is the most notable cause in this regard. So, ensure your fertilizing.
Bell Peppers Pests and Diseases
Bacterial leaves spot, verticillium wilt and mosaic virus are the common diseases on peppers. Again, you should watch closely for spider mites, thrips and aphids as for pests. Growing Bell Peppers in Pots below follow;
No Peppers or Falling off Flower;
This is such a concern when the gardener finds only frustration after a long time of cultivation. If you notice that the flowers are falling off or your plants are not producing any fruit, there may some reasons.
Temperature is an essential condition but high temperature may cause your flower drop off. Again, poor yields may be resulted from over watering.
At the same time, poop pollination may be another possible reason. If you think it to be the actual reason, simply drive a brush across all your flowers and this’ll transfer pollen among them and unsure pollination.
Harvesting Bell Peppers
It noted that most bell peppers take approximately 75 days to develop ripe peppers from the date of outdoors transplant. Do you like to enjoy some bright red colored peppers? Allow them to stay on the plants until they take the color naturally. Growing Bell Peppers in Pots that’s all.
Want an early harvest? Don’t worry, you can even enjoy bell peppers when they are green. Just wait to become the fruit fully matured. When the size is max, harvest and enjoy and stay with us in smallveggarden.com.

